Based on my personal installation experience, today we’re going to talk about home solar power systems. I’m not endorsing any brand. I’ll share all my experience and the pitfalls I’ve encountered. After reading this, you’ll understand: what size system you need, whether you should install a battery, where to buy reliably, how much it costs, how to get subsidies, and what the biggest pitfalls of solar are.
What is a Home Solar Power System?
A solar power system is equipment that converts sunlight into electricity. It falls under the category of photovoltaic (PV) power systems.
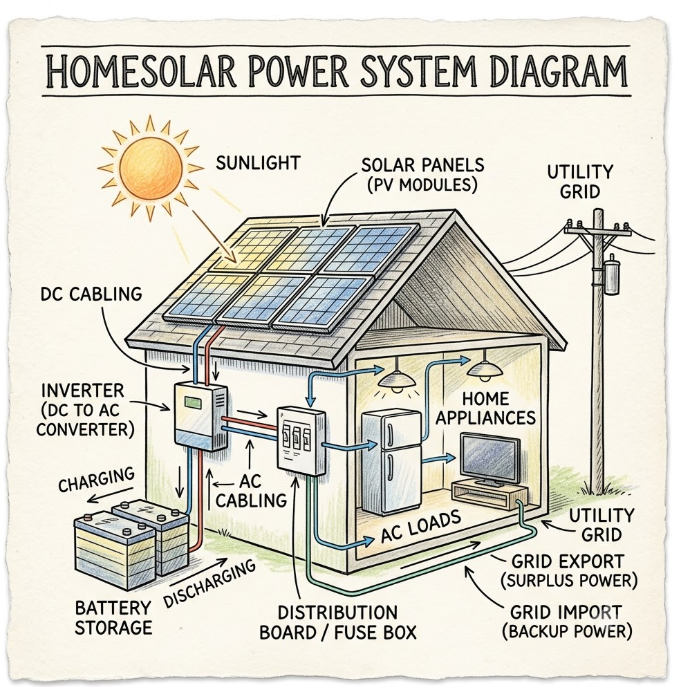
The schematic diagram below will help you understand it faster.
Solar Panels: Solar panels on the roof absorb sunlight and generate direct current (DC) electricity.
Inverter: Converts DC electricity into alternating current (AC) that household appliances can use. It’s like that big box mounted on your wall.
Meter and Grid: AC electricity enters the distribution panel, prioritizing power for household appliances. Excess electricity is then sent back to the grid through a bi-directional meter, helping you save on electricity bills according to your local net metering policy.
Battery: Excess electricity generated by the solar panels can be stored in batteries. This stored power can be used by household appliances during outages or at night. Not every system has a battery; it mainly depends on the system type. If you want to learn more about batteries, you can read the article “Home Solar Battery Storage Systems.“
Types of Home Solar Systems
1. Grid-Tied System (No Battery): This is the most common type of solar panel system. It generates power during the day and uses grid power at night. Savings come from your local net metering policy. The cost is relatively low, but if the grid goes down, your home will also lose power.
2. Grid-Tied System with Battery (Hybrid System): The battery can discharge power to household appliances during periods of high electricity prices. It can also serve as a backup power source for your home during outages. I added a battery to my own house later, and that’s when I truly gained a sense of security against power outages.
3. Off-Grid System: Completely independent from the grid. This type requires large battery banks and a backup generator. For folks in remote mountainous areas or those with mobile homes, this is often the only option.
Of course, you can also directly purchase a complete home solar power system kit that includes a battery. These kits come with solar panels, inverters, batteries, mounting brackets, and even cables pre-matched. They are especially suitable for folks with good DIY skills.
Calculating Your Home Solar Power System Needs
Many folks ask: How much solar power do I need to sustain my household electricity? Don’t worry, I’ll tell you.
1. Step 1: Find Your Annual Electricity Usage
Find your 12 months of electricity bills at home and calculate the total consumption. My home has four people, is about 2200 square feet, and uses roughly 15,000 kWh per year.
2. Step 2: Assess Solar Resources
Use the NREL PVWatts online calculator (this is the definitive authority for home solar system calculators). Input your address, roof orientation, tilt angle, and shading conditions. For my south-facing roof with a 20-degree tilt and system efficiency losses of about 14%, each 1kW of system generates approximately 1,500 kWh annually.
3. Step 3: System Size Calculation
Divide your annual electricity usage by the annual generation per kW. 15,000 kWh ÷ 1,500 kWh = 10 kW. To leave a little buffer, I installed a 10.4 kW system.
Common Questions
During our calculations, many folks have some questions. Let me address them.
Can I run two air conditioners on a 5kW solar system?
Many folks think 5kW sounds substantial, but realistically, a 3-ton central AC unit has a steady-state power draw of about 3-3.5 kW. Moreover, during startup, the current surges by at least 2-3 times, potentially requiring 5-7 kW or even higher instantaneous power. If two AC units start simultaneously, a 5kW inverter will most likely go into overload protection. Unless you install soft starters on the AC units and stagger their start times, you’ll likely need at least an 8kW+ system for two central AC units. My 10kW system handles two AC units and the whole house load effortlessly, but during midday when AC is running full blast along with other appliances, the battery discharge rate also needs to keep up.
How should I choose battery capacity?
If you’re looking for the best match between solar panels and a battery system, remember this: battery capacity should cover your core electricity usage from sunset until the sun comes out the next day. Check your meter data for this. My nighttime baseline load – refrigerator, internet, lights, fans, etc. – is about 0.4 kW. Over 10 hours, that’s 4 kWh. Accounting for deep discharge protection and occasional microwave use, I paired my system with a 13.5 kWh battery. The Tesla Powerwall is a typical example, and you can also parallel multiple units.
Solar Panels, Kits, Channels – How Should I Choose?
How to Choose Solar Panels?
Solar panels on the market may look similar, but their efficiency varies greatly. The current mainstream is shifting towards N-type monocrystalline silicon, using TOPCon or HJT technologies, easily achieving efficiencies over 21% with better temperature coefficients. I have my own set of metrics for selecting solar panels: efficiency > 21%, power temperature coefficient < -0.30%/°C, product warranty of 25+ years, and a clear linear power warranty. The best solar panels meeting these criteria usually come from Tier 1 manufacturers like REC, Qcells, Panasonic, and China’s Longi, Jinko Solar, etc. They all have stable distribution channels in the US.
How to Choose a Solar Panel Purchase Channel?
1. Local Installers: This is my most recommended approach. Get multiple quotes via EnergySage or SolarReviews. They compete fiercely, often offering lower prices than national brands. I ultimately chose a local EPC (Engineering, Procurement, and Construction) company. My 10.4 kW system with microinverters cost just under $26,000 (pre-incentive). Their workmanship was meticulous, and the grid interconnection process was lightning-fast. Searching for “free solar quotes” lets you compare costs risk-free.
2. National Brands: Companies like Sunrun, SunPower, etc., offer turnkey services with brand backing, but typically carry a 20%-30% premium. Suitable for those who don’t want any hassle and have a sufficient budget.
3. DIY (Do-It-Yourself): I once bought a complete home solar kit with a battery: 6.5 kW of panels, an EG4 6.5 kW hybrid inverter, one 5.1 kWh battery, and all necessary cables and connectors. I spent a weekend installing it myself, hired an electrician for final connections and grounding, and then applied for inspection. However, be aware: DIY grid-tied systems are not permitted in most states because utility companies only accept interconnection applications from licensed installers. Thus, true, perfectly DIY-able systems are limited to off-grid or portable setups. You can find suitable panels at sites like Signature Solar, AltE Store, etc.
4. Specialty Kits for Mobile Homes: For solar panels on mobile homes, roof load capacity and area are key considerations. Usually, flexible lightweight panels or small steel frames are used, paired with portable power stations. I helped a friend with their RV, using Renogy’s flexible panels and a portable power station – it worked great.
Core Component Selection Reference
Here are some of my personal opinions and references. Choose based on your needs.
1. Inverters: Enphase microinverters (panel-level monitoring, detailed, safe), SolarEdge (power optimizers + central inverter, good price/performance ratio). For string inverters, I trust Fronius and Huawei (in some markets).
2. Batteries: Tesla Powerwall remains the benchmark. Additionally, FranklinWH and Enphase IQ Battery offer high integration. China’s Pylontech and BYD batteries are also widely shipped by US integrators.
3. Mounting: IronRidge, Unirac. Corrosion resistance and load capacity are paramount.
What is the Cost of Home Solar, How to Get Subsidies, and What is the Payback Period?
Realistic Prices in the US Market
Currently, the full “home solar power system price” before the federal tax credit ranges from about $2.50 to $3.50 per watt. A 10kW system averages between $25,000 and $30,000. Usually starting around $25,000, varying based on component quality, roof complexity, and regional factors.
If you search international prices, you might find residential solar system prices in the Philippines as low as $0.50-$1.00 per watt. But folks, that’s the FOB (Free On Board) price for equipment, *not* including US National Electrical Code (NEC) compliant installation, permitting, and labor costs.
Government Subsidies and Tax Credits
Federal ITC (Investment Tax Credit): Currently, 30% of the total installed system cost can be credited against federal income tax. No upper limit, can be carried forward. My 10.4 kW system was priced at $26,000 total, giving me a federal credit reducing my taxes by $7,800 directly.
State and Local Incentives: Vary drastically. Check the DSIRE database. States like New York and California offer additional state tax credits or performance-based incentives. Many municipalities have “Solarize” group purchasing plans. Low-income households or communities may sometimes qualify for extra grants. Texas has few incentives, but high electricity bills are a powerful motivator.
Net Metering Policies: This is an invisible economic subsidy. Most states require utilities to credit excess exported power at the retail electricity rate. However, some states are reducing this, paying only the wholesale rate. This was the trigger for me to add a battery.
Payback Period
My system’s net cost was $18,200 (post-tax credit). My previous average annual electricity bill was $2,600. So, roughly a 7-year payback period. Considering electricity prices rise 3%-5% annually, the actual payback might shorten to about 6 years. But be careful, folks: if your state suddenly adjusts net metering rules or your homeowner’s insurance increases premiums because of the rooftop solar, your payback period will lengthen. Also, if your roof needs replacement after 20 years, the cost to remove and reinstall the panels will set you back thousands – these are things salespeople often won’t tell you.
How to Install a Home Solar Power System: DIY or Hire a Pro?
DIY Home Solar Power System
While a DIY home solar system sounds appealing, as someone who’s been there, my advice is: you can DIY a small ground-mounted off-grid system, but *absolutely do not touch a rooftop grid-tied system*.
Personally, I built a small DIY system for LED lighting and USB charging. I followed NEC DC wiring rules strictly, installed fuses and breakers, and passed local inspection. It was a 12V independent system with a 200W panel, a 100Ah LiFePO4 battery, and an MMPT controller. If you want to learn “how to build a solar power system for your home,” at minimum: use UL-listed equipment, install DC fuses for all circuits, ensure the battery box is ventilated and secure, and leave AC connections to a licensed electrician. Grid interconnection application is the ultimate barrier – without an electrician’s license, you cannot submit a NEM application, and unauthorized connections can lead to disconnection and fines.
Professional Home Solar System Installation Process
1. Get Free Solar Quotes: Enter your address on EnergySage. Receive 3-5 competitive bids within 24 hours, comparing system size, equipment lists, and unit prices for your “home solar system.”
2. Site Survey: Installer engineers visit to measure the roof, use professional tools to assess shading, and confirm structural integrity.
3. System Design: They produce an electrical design, similar to a “home solar power system schematic,” detailing the string configuration and inverter placement.
4. Permitting and Applications: They handle municipal permits and utility interconnection agreements.
5. Installation and Inspection: Typically 2-3 days of installation, followed by site inspections by municipal inspectors and utility representatives.
6. Interconnection and Switch-On: The bi-directional meter is installed, the system is officially activated, and you can immediately see the generation curve on your mobile app.
Finally, make sure you watch these critical points: roof penetration waterproofing, grounding of microinverters or power optimizers, and whether the main electrical panel capacity is sufficient. If your panel is old, you might need a costly $1,500 – $3,000 upgrade – clarify this in your contract.
Things Installers Won’t Tell You
1. Beyond policies, consider your homeowner’s insurance. Some insurers require adding solar to the replacement cost, potentially increasing annual premiums by $50-$200. Call and confirm beforehand.
2. I built my own small emergency solar power kit: two 120W folding panels and an EcoFlow Delta Pro portable power station (3.6 kWh). Total investment under $2,000. This combo kept a fridge and fan running for over 24 hours while camping; after a hurricane, it served as a secondary backup to keep the freezer running. For mobile home owners, this combo is a fantastic RV companion – panels fold flat and charge on the go.
3. I use an app to log daily generation per panel. If a panel’s output is consistently low, check for leaf shading or bird droppings – a simple water rinse often fixes it. Keep the battery system at room temperature for slower capacity degradation. Inverter failures typically occur in years 8-12; warranties usually cover 10-12 years, so budget for extended warranties or eventual replacement.
Final Planning and Ordering Process
1. Gather 12 months of electricity bills, calculate total annual kWh.
2. Use PVWatts to evaluate roof potential, estimate your “whole-house solar” capacity.
3. Determine system type: grid-tied / hybrid / off-grid, need for battery.
4. Request at least 3 “free solar quotes” via EnergySage or local platforms.
5. Compare price per watt, equipment brands, warranties, and check installer licenses and reviews.
6. Clarify contract details: total power (distinguish STC and PTC), annual production guarantee, roof penetration warranty, equipment maintenance responsibilities.
7. Verify federal ITC and state incentive application processes, consult an accountant.
8. The installer handles permitting and interconnection agreements, but keep your own copies.
9. Take photos of wiring and waterproofing points during construction; test outage protection during final inspection.
10. Install the monitoring app and set alerts for abnormal generation.
Learning Resources
These are some resources and tools I personally like. Feel free to check them out yourselves.
1. Whole-house system calculator: NREL PVWatts
2. Government incentive lookup: DSIRE database (lists grants and rebates by state)
3. Comparison platforms: EnergySage (best for “free solar quotes”), SolarReviews (check reputations)
4. Off-grid and kit purchases: Signature Solar, AltE Store, Renogy
5. Tesla official website: Check latest “Tesla home solar panels” pricing for baseline reference.
6. Learning forums: DIY Solar Power Forum, Reddit (countless real-world cases)
Finally, I want to say something heartfelt: A home solar power system is not a consumer good; it’s an infrastructure investment that will serve you for over 10 years. Therefore, you need to find the balance between price, quality, and service. You must actively participate in the planning, invest time in learning, boldly ask for quotes, and carefully read contracts. When your system quietly delivers power from the last rays of sunlight one evening, you’ll feel all the homework was worth it.